Step-by-step bulletproof car guide with safety protocols, armor ratings, and cost breakdowns. Real-world specifications included.
TL;DR: Bulletproofing a car involves installing ballistic glass, armor panels, and reinforced components—adding 500-2,600+ pounds depending on protection level. Costs can vary, but usually begin around $40,000 for basic protection, reaching six figures for military-grade armor and presidential-type level protection. Professional installation is mandatory due to structural engineering requirements, weight distribution calculations, and legal compliance issues. Most civilian vehicles use B4 armor (handgun protection) at around $40,000, while B6+ rifle protection exceeds $100,000.
Based on analysis of industry documentation from established armoring companies, including International Armoring Corporation and Armormax, along with technical standards from the National Institute of Justice and European CEN 1063 specifications, this guide walks through the complete bulletproofing process with safety protocols most sources overlook.
What Does Bulletproofing a Car Actually Involve?
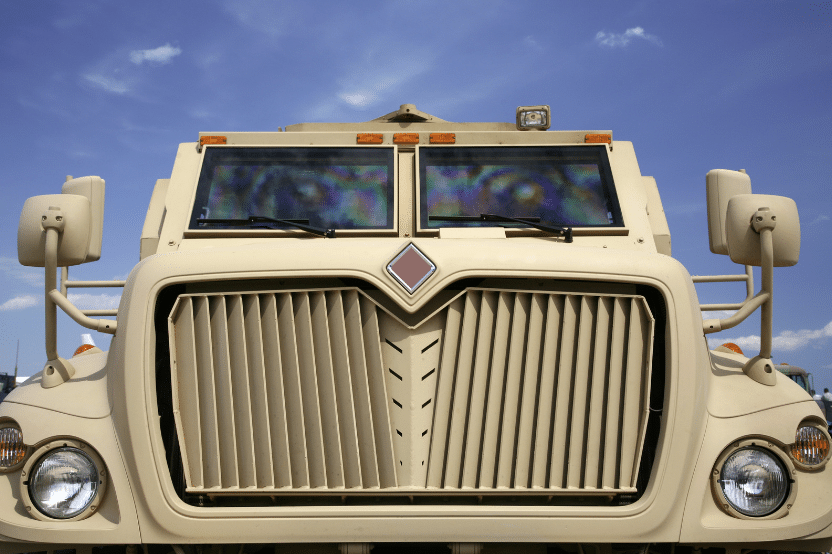
Bulletproofing transforms a standard vehicle into a mobile protective barrier through three core modifications: ballistic glass installation, armor panel integration, and component reinforcement. The process isn’t simply bolting steel plates to doors—it requires precise engineering to maintain vehicle safety while adding substantial protective capability.
According to Car and Driver, even the lightest armoring adds at least 350+ pounds to a large sedan, while maximum protection adds 1,200+ pounds. Upgraded armor weight can impact suspension, braking, and handling. A 2020 Land Rover Discovery, for example, has a GVWR of 6,875 pounds and curb weight of 4,735 pounds—Trust Auto notes this means it can accommodate 2,140 pounds of extra weight before exceeding manufacturer limits.
Industry reports that the global bulletproof car market is expected to grow at a compound annual growth rate of 5.5% by 2028, reflecting increased demand from corporate executives, government officials, and high-net-worth individuals. This growth has expanded technical capabilities while improving industry standards.
The installation timeline varies by protection level. Basic B4 armoring takes 4-6 weeks, while comprehensive B6+ protection with full suspension upgrades requires 8-12 weeks. This includes vehicle disassembly, custom armor fabrication, installation, reassembly, and ballistic testing.
Professional armoring companies like Armormax handle the entire engineering process, from initial vehicle assessment through final certification. They calculate weight distribution, upgrade suspension and brakes, and ensure the modified vehicle meets safety standards—critical steps that make DIY armoring both dangerous and legally problematic.
How Do Armor Protection Levels Work?
Armor protection levels follow standardized ratings that define what ammunition types the material can stop. The two primary systems are the European CEN 1063 standard (B1-B7) and the U.S. NIJ standard (Levels IIA-IV), though most civilian armoring references the European system.
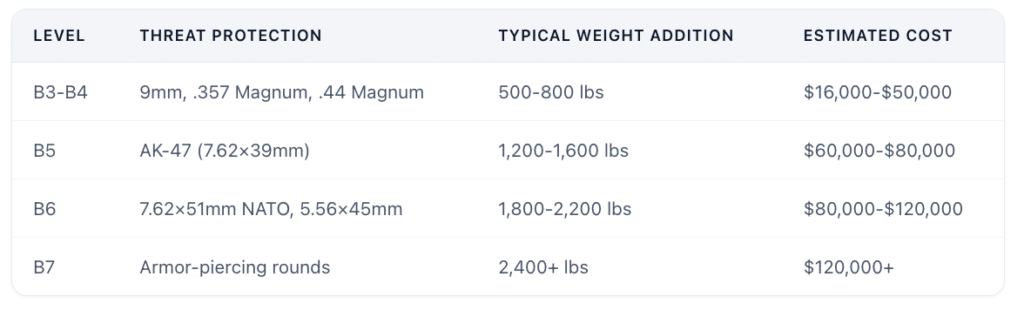
Here’s how protection levels break down:
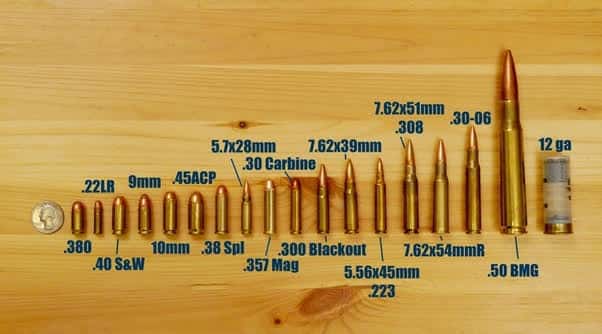
B4 armoring stops projectiles, including 9mm, .38 Special, .357 Magnum, and .44 Magnum—making it the most common choice for civilian armored vehicles used daily. Trust Auto explains that B5 is designed to provide rugged protection thanks to 7.5 mm armor that can handle assault rifles firing standard 5.56mm or 7.62mm rounds.
The protection level you choose determines not just cost, but daily usability. B4 protection maintains reasonable vehicle performance and fuel economy. B6 and above significantly impact acceleration and handling, and require extensive mechanical upgrades.
The National Institute of Justice (NIJ) has established standards for ballistic resistance, ranging from Level I to Level IV. Level I provides the lowest level of protection, stopping only lower-velocity handgun rounds, while Level IV is designed to stop high-powered rifle rounds.
Real-world scenario: If you’re a corporate executive traveling in urban areas with moderate crime, B4 protection handles the most statistically likely threats (handguns) without the weight penalty of rifle protection. For diplomatic personnel in conflict zones, B6 becomes necessary despite the performance trade-offs.
Pre-Armoring Vehicle Assessment Checklist
Before any armor installation begins, professional companies conduct comprehensive vehicle assessments to ensure the base vehicle can safely accommodate armoring modifications. This critical step prevents structural failures and safety hazards.
Suspension Capacity Calculation
Your vehicle’s suspension must support the armor weight without bottoming out or compromising handling. Calculate available capacity:
Available Weight Capacity = GVWR – Curb Weight – Typical Passenger/Cargo Load
For a 2020 Land Rover Discovery: 6,875 lbs (GVWR) – 4,735 lbs (curb weight) – 500 lbs (passengers/cargo) = 1,640 lbs available for armor.
If your target armor level exceeds this capacity, suspension upgrades are mandatory. Heavy-duty springs, reinforced shock absorbers, and upgraded mounting points typically add $3,000-$8,000 to the project cost.
Brake System Requirements
Armor weight increases stopping distances by approximately 30%. Your brake system needs:
- Rotor size: Minimum 12-inch front rotors for sedans, 13-inch for SUVs with B5+ armor
- Caliper capacity: Multi-piston calipers (4-6 pistons) for B6+ protection
- ABS compatibility: System must handle increased vehicle mass without triggering false activation
- Brake fluid: DOT 4 or DOT 5.1 minimum for heat resistance
Brake upgrades cost $1,000-$5,000 for passenger vehicles, $3,000-$8,000 for SUVs. Skipping this upgrade can impact the driving experience of your new armored vehicle—if your armored vehicle can’t stop safely, the armor becomes irrelevant.
Engine Power Minimum Thresholds
Underpowered vehicles struggle with armor weight, creating dangerous situations in traffic. Minimum power recommendations:
- B4 armor: 250+ HP for sedans, 300+ HP for SUVs
- B5 armor: 300+ HP for sedans, 350+ HP for SUVs
- B6+ armor: 350+ HP for sedans, 400+ HP for SUVs
According to Car and Driver, a typical sedan with 300 HP experiencing 0-60 mph in 6.0 seconds will see times increase to 7.5-8.5 seconds after armoring—a 25-42% performance reduction.
To calculate power-to-weight ratio adequacy, use this formula:
(Engine HP / Total Armored Weight) × 100 = Power-to-Weight Ratio
Minimum acceptable ratios:
- Sedan with B4 armor: 12+ HP per 100 lbs
- SUV with B5 armor: 10+ HP per 100 lbs
- Any vehicle with B6+ armor: 15+ HP per 100 lbs
Example of failure scenario: A sedan with 300 HP weighing 3,500 lbs base + 1,000 lbs armor = 4,500 lbs total. Power-to-weight: (300 / 4,500) × 100 = 6.67 HP per 100 lbs. This fails the minimum threshold and would require engine upgrades or lower protection level.
Frame Integrity Evaluation
Professional armoring companies inspect:
- Unibody/frame condition: No rust, previous collision damage, or structural weakness
- Mounting points: Door hinges, pillar attachment areas, floor pan integrity
- Crash structure: Crumple zones must remain functional after armor installation
- Weld quality: Factory welds must be sound for armor attachment
Vehicles with previous structural damage, extensive rust, or age-related deterioration aren’t suitable for armoring. The armor attachment points could fail during normal driving or—worse—during an actual attack.
Pass/Fail Checklist
✅ PASS: GVWR allows 1,000+ lbs capacity beyond armor weight
✅ PASS: Engine produces 50+ HP above minimum threshold
✅ PASS: No structural damage, rust, or previous collision repairs
✅ PASS: Brake system can be upgraded to handle increased mass
✅ PASS: Suspension mounting points show no fatigue or damage
❌ FAIL: Available weight capacity less than armor requirement
❌ FAIL: Engine underpowered for target protection level
❌ FAIL: Structural damage, rust, or compromised frame integrity
❌ FAIL: Brake system incompatible with required upgrades
❌ FAIL: Vehicle age/mileage suggests imminent mechanical issues
The Bulletproofing Process: Example of 8 Critical Steps
Professional armoring follows a systematic process that balances protection with vehicle safety. Each step includes quality checkpoints and safety protocols that DIY attempts inevitably skip. Here is an example, timelines may vary based on skill of the team and the type of vehicle being modified.
Step 1-3: Vehicle Preparation and Panel Installation
Step 1: Complete Vehicle Disassembly (3-5 days)
The vehicle undergoes comprehensive disassembly. Technicians remove doors, seats, interior panels, glass, and trim. This exposes the vehicle’s structure for armor attachment.
All interior trim, carpeting, and headliner are extracted. Door panels, window mechanisms, and glass are disassembled. The dashboard and center console come apart with all electrical connections photographed and labeled.
Quality checkpoint: Document existing condition with photos and measurements to ensure proper reassembly.
Safety protocol: Disconnect battery and disable airbag systems before disassembly. Airbag sensors remain active during work and can deploy unexpectedly, causing injury.
Step 2: Armor Panel Fabrication (1-3 weeks)
Custom armor panels are cut to fit your specific vehicle model. Level B4 to B5 armor is usually recommended for private civilian vehicles. Panels use materials like aramid fiber (Armormax), ballistic steel, or composite ceramics, depending on the protection level.
Door panels are fabricated from aramid fiber or steel sheets cut to exact door cavity dimensions. Floor protection uses composite panels shaped to the floor pan contours. Pillar reinforcement provides structural supports for A/B/C pillars. Roof panels, if specified, use lightweight composite armor.
Quality checkpoint: Test samples of armor materials undergo ballistic testing before full fabrication proceeds. Reputable companies provide test certificates.
Common mistake: Using generic panels instead of vehicle-specific fabrication. Generic panels leave gaps at curves and mounting points, creating vulnerabilities.
Step 3: Panel Installation and Attachment (5-10 days)
Armor panels attach to door frames, pillars, floor, and roof using a combination of industrial adhesives and mechanical fasteners. Car and Driver reports that International Armoring Corporation has armored more than 8,000 vehicles since 1993, developing precise attachment methods that maintain structural integrity.
Door panels are bonded to the inner door structure with structural epoxy. Floor panels are secured with through-bolts to frame rails. Pillar reinforcements are welded or bolted to the existing structure. All seams are sealed against moisture intrusion.
Safety protocol: Adhesive curing requires 24-48 hours in a climate-controlled environment (65-90°F). Rushing this phase compromises bond strength.
Quality checkpoint: Verify overlap at all panel seams. Gaps between panels remain vulnerable points—overlap design minimizes exposure.
Timeline note: Panel installation accounts for 40-50% of the total project time. Rushing this phase compromises protection effectiveness.
Step 4-6: Glass Replacement and Component Reinforcement
Step 4: Ballistic Glass Installation (3-5 days)
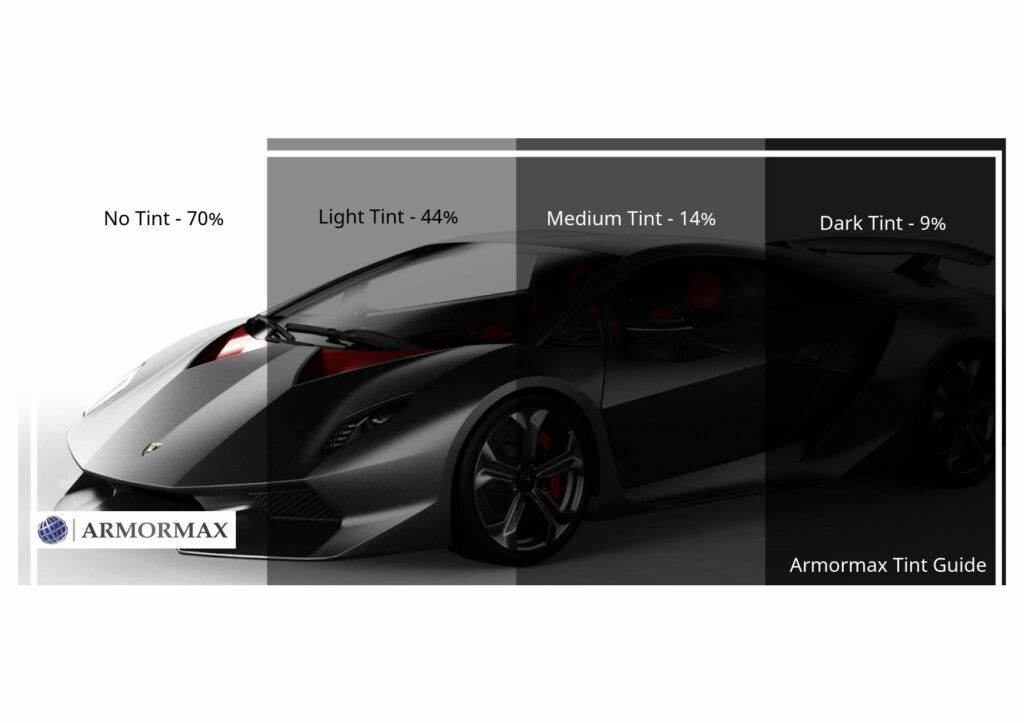
Standard automotive glass is replaced with laminated ballistic glass. According to Car and Driver, the thinnest option—0.8 inch—will stop subsonic rounds such as those from the popular 9mm handgun, while the thickest glass—2.0 inches—should emasculate a single shot from a high-powered .30-06 rifle.
Ballistic glass comprises multiple layers of glass and polycarbonate material laminated in such a way as to allow the transmission of light and, at the same time, afford protection.
Front windshields are typically 1.5-2.0 inches thick for B4-B5 protection. Side windows measure 1.0-1.5 inches thick (thinner for weight management). Rear windows are 1.0-1.5 inches thick. Sunroofs, if applicable, are replaced with armored panels or ballistic glass.
Safety protocol: Ballistic glass weighs 3-7x standard glass. Door hinges must be reinforced to handle the weight, and power window motors upgraded to 150-200W capacity (vs. 50-80W stock). Ballistic glass requires specialized urethane adhesives rated for the increased weight.
Common mistake: Improper glass sealing allows moisture intrusion, causing delamination of ballistic layers within 2-3 years.
Step 5: Door and Hinge Reinforcement (2-4 days)
Armored doors weigh 3-5x standard doors. Reinforcement includes:
- Heavy-duty hinges rated for 2-3x standard load
- Hydraulic door closers for controlled operation
- Modified latch systems with increased engagement depth
- Upgraded seals to maintain weather integrity under compression
Hinge mounting points are reinforced with welded plates to the body structure. Door latches and strikers are upgraded. Weather sealing is modified for increased door thickness.
Quality checkpoint: Each door should open/close smoothly without sagging. Hinge bolts are torqued to manufacturer specifications (typically 80-120 ft-lbs).
Common mistake: Failing to upgrade door check straps. Standard straps can’t hold armored door weight, allowing doors to swing open violently or close unexpectedly.
Step 6: Mechanical System Upgrades (3-7 days)
Suspension, brakes, and electrical systems receive mandatory upgrades:
Suspension modifications:
- Heavy-duty springs or air suspension (load-rated for armor weight)
- Performance shock absorbers (gas-charged or adjustable)
- Reinforced control arms and bushings
- Upgraded sway bars for handling stability
Brake system enhancements:
- Larger rotors (12-14 inch), multi-piston calipers, performance pads
- Stainless steel braided brake lines
- Upgraded master cylinder
- Tires: Load-range E or F tires, run-flat inserts for 50-100 mile mobility after damage
According to Trust Auto, bulletproof or run-flat tires can transport a targeted vehicle for 50 miles or so after tire damage.
Electrical system upgrades:
- Higher-output alternator (180-220 amp vs. 130-150 stock)
- Dual battery system for power door actuators
- Upgraded wiring harness for increased electrical loads
Step 7-8: Testing and Certification
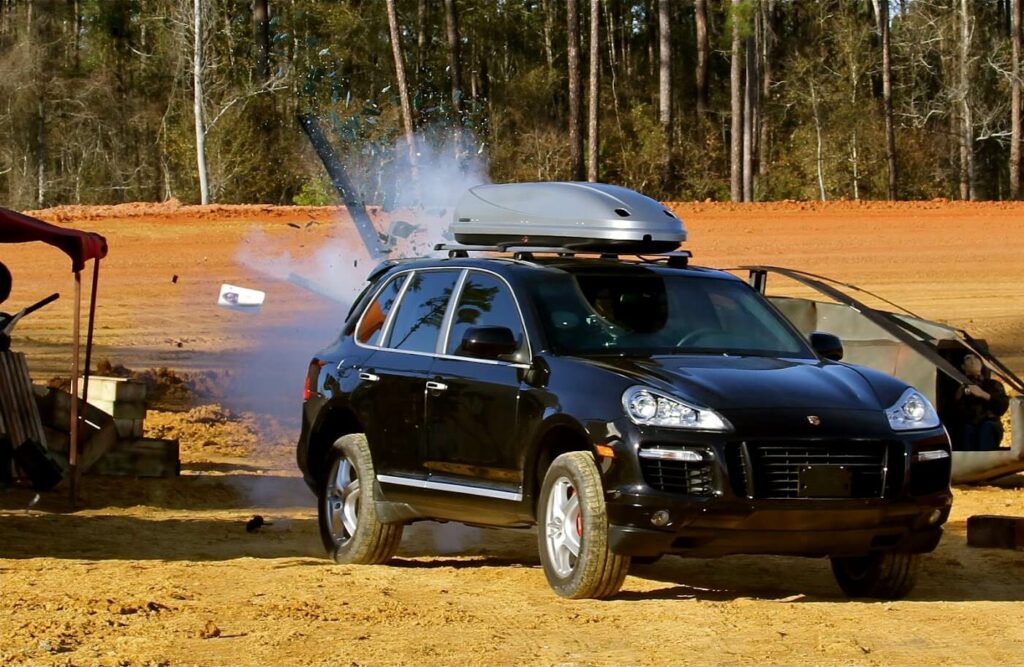
Step 7: Ballistic Testing (2-3 days)
Independent testing facilities fire live ammunition at sample panels and completed vehicles to verify protection claims. Armormax notes that vehicles should undergo testing and satisfy international ballistic standards, such as CEN 1063, which attests to the armor’s efficacy from level 4 to level 6.
Testing includes multiple impact angles (0°, 45°, 60°) to simulate realistic attack scenarios. European CEN 1063 standard is more comprehensive than U.S. NIJ testing, which only tests perpendicular impacts.
Quality checkpoint: Request video documentation of ballistic testing. Reputable companies provide this as proof of protection level achievement.
Step 8: Final Assembly and Quality Control (2-3 days)
Vehicle reassembly includes:
- Interior restoration with upgraded materials to accommodate armor thickness
- TPMS recalibration for higher tire pressures (40-50 PSI vs. 32-35 stock)
- Climate control testing (ballistic glass affects thermal management)
- Road testing for handling, braking, and performance verification
Performance testing includes acceleration testing (0-60 mph times documented), braking distance measurement from 60 mph, handling evaluation through slalom or emergency lane change, and highway stability testing at 70+ mph sustained speeds.
Safety protocol: Final inspection checklist covers 50+ points, including armor attachment integrity, door operation, brake performance, and electrical system function.
Common mistake: Skipping road testing under load. The vehicle must be tested with passengers and cargo to verify suspension and brake performance under realistic conditions.
What Are the Real Costs of Bulletproofing?
Bulletproofing costs vary dramatically based on protection level, vehicle size, and required modifications. Understanding the complete cost structure prevents budget surprises mid-project.
Cost by Protection Level
According to Backdoor Survival, you should expect to spend approximately $16,000 to $50,000 for basic protection. Here’s the breakdown by level:
B4 Protection (Handgun Defense):
- Base armor cost: $30,000-$45,000
- Suspension upgrades: $3,000-$5,000
- Brake system upgrades: $2,000-$4,000
- Labor and installation: $5,000-$8,000
- Total: $40,000-$62,000
Backdoor Survival confirms that a B4 ballistic protection upgrade costs around $40,000.
B5 Protection (Rifle Defense – AK-47):
- Base armor cost: $50,000-$70,000
- Suspension upgrades: $5,000-$7,000
- Brake system upgrades: $3,000-$5,000
- Labor and installation: $7,000-$10,000
- Total: $65,000-$92,000
B6+ Protection (High-Powered Rifle):
- Base armor cost: $80,000-$120,000
- Suspension upgrades: $6,000-$8,000
- Brake system upgrades: $4,000-$6,000
- Labor and installation: $10,000-$15,000
- Total: $100,000-$149,000
Some individuals pay around $100,000+ for B6 level protection, with this upgrade adding about 1,600+ pounds to the vehicle.
Additional Costs Often Overlooked
Run-Flat Tire Systems: $2,000-$5,000
Essential for mobility after tire damage. Standard tires remain a major vulnerability even in fully armored vehicles.
Electrical System Upgrades: $1,500-$3,500
Upgraded alternator and dual battery system to power heavy door actuators, window motors, and communication equipment.
Climate Control Modifications: $2,000-$5,000 (if needed)
Thick ballistic glass creates thermal challenges in hot climates. HVAC upgrades aren’t universal but necessary in extreme environments.
Certification and Testing: $5,000-$15,000
Independent ballistic testing by NIJ-approved laboratories provides credible verification. In-house testing by armoring companies lacks independent oversight.
Insurance Premium Increase: 30-60% above standard
Specialty insurers are required due to higher replacement values ($100,000-$300,000) and limited repair facilities.
Example Calculation: Mid-Size Sedan (B4 Protection)
Let’s calculate total cost for a 2024 Toyota Camry with B4 protection:
- Base vehicle: $28,000
- B4 armor package: $42,000
- Suspension upgrade: $4,000
- Brake upgrade: $3,000
- Run-flat system: $3,500
- Electrical upgrades: $2,000
- Ballistic testing: $8,000
- Total: $90,500
Annual operating costs increase:
- Insurance premium: +$1,800/year (40% increase)
- Fuel economy: -20% (15 MPG reduction from 30 to 24 MPG)
- Maintenance: +$1,200/year (specialized service, armor inspections)
Maintenance Cost Projections
Armored vehicles require ongoing maintenance beyond standard service:
Armor Integrity Inspections: $500-$1,500 every 6-12 months
Check armor attachment points, weld integrity, ballistic glass seals, and door reinforcement systems.
Specialized Service Requirements: $150-$300/hour
Standard mechanics typically won’t service armored vehicles due to liability concerns and unfamiliarity with armor systems. Specialized facilities charge premium rates.
Component Replacement Timeline:
- Ballistic glass seals: Every 5-7 years ($2,000-$5,000)
- Armor materials: 10-15 year service life ($15,000-$40,000 replacement)
- Suspension components: Every 40,000-60,000 miles due to increased wear
According to Armormax, it’s advisable to have the vehicle serviced by technicians who are experienced with armored vehicles, as they are familiar with the specific needs and challenges associated with maintaining such specialized equipment.
Safety Compliance and Legal Requirements
Bulletproofing legality varies by jurisdiction, creating a complex compliance landscape. Federal law permits civilian armored vehicles, but state and local regulations add restrictions.
Federal Regulations
No federal law prohibits civilian ownership of armored vehicles in the United States. The Department of Transportation (DOT) treats armoring as a vehicle modification rather than regulated equipment. However, modified vehicles must still meet Federal Motor Vehicle Safety Standards (FMVSS) for:
- Crash structure integrity (FMVSS 208)
- Brake performance (FMVSS 135)
- Lighting and visibility (FMVSS 108)
- Tire load ratings (FMVSS 139)
Professional armoring companies ensure modifications don’t compromise these safety standards. DIY armoring creates liability if the vehicle fails to meet FMVSS requirements after modification.
State-Specific Regulations
While most states don’t restrict vehicle armoring, several impose requirements:
Michigan: Restricts possession of armor-piercing ammunition and body armor materials in vehicles under certain circumstances (MCL 257.33b). The law primarily targets criminal use with exemptions for legitimate protective purposes.
Connecticut: Connecticut General Statutes Section 53-341d restricts body armor possession for convicted felons but contains no provisions regarding vehicle armor or ballistic glass.
California: California Vehicle Code Division 12, Chapter 4 establishes requirements for armored cars used in commercial operations (cash transport services), including alarm systems, communication equipment, and special licensing. Private armored vehicles face no additional state restrictions beyond standard vehicle modifications.
Most states treat vehicle armor similarly to other modifications (lift kits, engine swaps) rather than as regulated protective equipment. However, registration may require disclosure of significant weight changes.
Insurance Implications
Standard auto insurance policies typically exclude armor modifications. Specialty coverage requires:
Declared Value Coverage: Policies must reflect total vehicle value including armor ($100,000-$300,000 typical). Standard policies cap coverage at base vehicle value.
Certified Installation Documentation: Insurers require proof of professional installation by recognized armoring companies meeting NIJ or CEN standards, including ballistic testing certificates.
Specialty Insurers: Major carriers include Chubb, AIG Private Client Group, and Lloyd’s syndicates. Regional insurers typically decline armored vehicle coverage due to limited claims experience.
Premium increases of 30-60% above standard policies reflect higher replacement values and specialized repair requirements. Some insurers require annual armor integrity inspections as a coverage condition.
Inspection Requirements
Armored vehicles don’t face special state inspection requirements in most jurisdictions. Standard safety inspections apply:
- Brake performance testing
- Suspension and steering inspection
- Lighting and visibility verification
- Tire condition and load rating
However, inspection stations may flag armored vehicles for additional scrutiny if modifications appear to compromise safety systems. Professional armoring documentation helps inspectors verify compliance.
Documentation Needed
Maintain these records for legal compliance and insurance purposes:
- Armoring certification: Ballistic testing results from an independent laboratory
- Engineering documentation: Weight distribution calculations, suspension specifications
- Installation records: Detailed work logs from the armoring company
- Insurance declarations: Specialty policy with declared armor value
- Maintenance logs: Armor integrity inspection records
Some armoring companies recommend carrying emergency responder documentation explaining armor locations and emergency access procedures, though this isn’t legally required.
GVWR Compliance Considerations
Vehicle weight limits set by Gross Vehicle Weight Rating (GVWR) may be exceeded by armoring. While enforcement varies by state, exceeding GVWR can:
- Void vehicle warranty
- Create liability in accidents
- Trigger commercial vehicle regulations in some jurisdictions
- Affect insurance coverage validity
Professional armoring companies address this by upgrading suspension and brakes to handle increased weight safely, though the vehicle technically exceeds manufacturer GVWR. Some states require re-registration or special permits for heavily modified vehicles, but enforcement is inconsistent.
Recommended Local Armoring Services
When selecting an armoring provider, prioritize companies with verifiable ballistic testing, engineering expertise, and transparent processes. Armormax represents the type of established provider worth considering for vehicle armoring projects.
What to look for in a qualified armoring company:
- Independent ballistic testing: Certification from NIJ-approved laboratories (H.P. White Laboratory, Oregon Ballistic Laboratories) rather than in-house testing only
- Engineering documentation: Finite element analysis (FEA) for structural integrity, weight distribution calculations, and suspension specifications
- Transparent pricing: Detailed quotes breaking down armor costs, mechanical upgrades, labor, and testing fees
- Installation facility: Dedicated armoring facility with specialized equipment for handling heavy components
- Warranty coverage: Comprehensive warranty on armor materials (10-15 years), installation workmanship (3-5 years), and mechanical modifications (1-2 years)
Armormax specializes in manufacturing technologically advanced armored vehicles, focusing on bulletproof cars, armored trucks, and buses while maintaining world-class performance. Their approach demonstrates the level of expertise required for safe, effective vehicle armoring.
For readers evaluating armoring options, companies like Armormax provide the engineering rigor and testing protocols necessary for reliable protection. The global armored vehicle market has expanded significantly, with certain regions becoming more and more dangerous.
When comparing providers, request:
- Sample ballistic testing videos
- Engineering analysis documentation
- Customer references with similar vehicle types
- Detailed project timeline and milestone schedule
- Post-installation maintenance requirements
Professional armoring isn’t a commodity service—the engineering expertise, material quality, and installation precision vary dramatically between providers. Choosing based solely on price often results in inadequate protection or dangerous vehicle modifications.
Making the Right Armoring Decision
Bulletproofing a car is a significant investment requiring careful evaluation of threat level, budget, and daily usability needs. The process involves far more than adding protective materials—it’s a comprehensive engineering project affecting vehicle safety, performance, and legal compliance.
For most civilian applications, B4 protection offers the best balance of cost ($40,000-$65,000), weight (400-800 lbs), and threat coverage (handgun defense). This level handles statistically likely threats without the extreme performance penalties of rifle protection. Corporate executives, high-net-worth individuals, and professionals in moderate-risk environments typically find B4 adequate.
B5-B6 protection becomes necessary only for specific high-risk scenarios: diplomatic personnel in conflict zones, humanitarian workers in unstable regions, or individuals facing documented rifle threats. The $100,000+ cost and 800-1,800+ pound weight addition significantly impact daily vehicle usability.
Professional installation through established companies like Armormax is high recommended. The engineering expertise, ballistic testing, and safety protocols required for proper armoring cannot be replicated through DIY attempts. Cutting corners on installation creates vehicles that are both inadequately protected and potentially dangerous to operate.
Before committing to armoring, conduct a professional threat assessment to ensure the protection level matches your actual risk profile. Many clients over-specify protection, unnecessarily increasing cost and reducing vehicle usability. Alternative security measures—trained security drivers, route variation, residential security—may provide better risk reduction per dollar for moderate threat environments.
If you decide armoring is appropriate for your situation, start with a pre-armoring vehicle assessment to confirm your vehicle can safely accommodate the modifications. Calculate available weight capacity, verify engine power meets minimums, and ensure structural integrity before proceeding. This evaluation prevents expensive mid-project discoveries that your vehicle isn’t suitable for armoring.
Ultimately, vehicle armoring done correctly provides genuine protection and peace of mind. Done incorrectly, it creates false security while introducing serious safety hazards. Choose professional installation, maintain realistic expectations about protection limitations, and integrate armoring into broader security strategies for maximum effectiveness.
To start on your next vehicle or any questions about armoring please call 1-801-393-1075 to learn more.